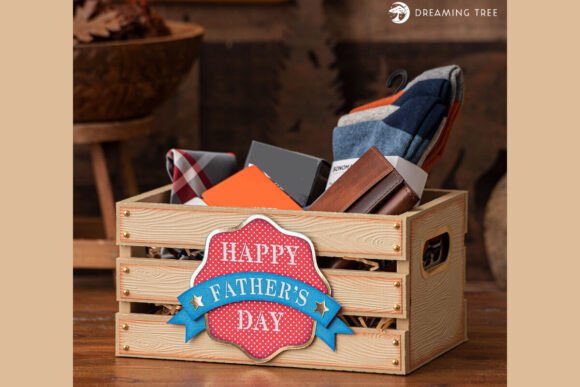
Surprise Dad with a Handcrafted Father’s Day Gift Crate SVG
Father’s Day is often celebrated with traditional gifts like ties, tools, or grooming kits. While these items are practical and appreciated, there is something undeniably special about a gift that has been made with your own hands. In an era where digital convenience reigns supreme, the act of creating a physical, personalized item carries a weight of sentiment that store-bought products simply cannot match. This is where the Father’s Day Gift Crate SVG comes into play—a project that blends rustic charm with modern crafting technology to create a memorable keepsake.
This guide explores how you can use this specific design to surprise Dad with a handcrafted paper crate. Whether you are a seasoned card-maker or a beginner looking for your first papercrafting project, understanding the nuances of this design will help you create a presentation box that Dad will cherish long after the treats inside have been enjoyed.
Why Choose a Rustic Paper Crate?
The concept of a "gift crate" taps into a popular aesthetic known as "rustic chic." This style emphasizes natural textures, earthy tones, and a sense of nostalgia. By designing a crate that resembles classic wooden shipping boxes, you evoke feelings of craftsmanship and durability. For many fathers, the idea of receiving a gift in a sturdy, box-like container feels more substantial than a simple wrapped present.
Beyond aesthetics, the functional aspect of a crate allows for creative gifting. It is not just a wrapper; it is a display case. You can fill it with small presents, gourmet treats, hobby-related accessories, or personalized notes. The open-top or hinged design (depending on your assembly preference) invites interaction, making the unboxing experience part of the gift itself. This transforms a standard item into a curated experience, showing Dad that you put thought and effort into every detail.
Understanding the Father’s Day Gift Crate SVG Design
At the core of this project is the SVG file, which stands for Scalable Vector Graphics. Unlike raster images (like JPEGs or PNGs) that pixelate when resized, SVGs maintain their crisp edges at any size. This makes them ideal for cutting machines, which read the vector paths to cut through materials with precision.
Key Features of the Design
- Rustic Aesthetic: The design mimics the look of a wooden crate, complete with details that suggest slats and corners.
- Customizable Dimensions: Designed primarily for 12×12 inch cutting machines, the file is fully scalable. If you need a smaller or larger crate, you can resize it in your software. Just note that final dimensions may vary slightly from the original blueprint.
- Compatibility: This file works seamlessly with all major SVG-ready cutting machines (such as Cricut or Silhouette) and compatible software platforms.
- Color Guidance: To assist with your creative choices, the download includes a handy PDF legend. This document helps you easily identify which pieces correspond to different layers, allowing you to pick your paper colors confidently.
Step-by-Step Assembly Guide
One of the most common fears among crafters is the complexity of assembly. However, this project is designed to be user-friendly. To ensure success, we recommend following a structured approach, utilizing the included resources to streamline the process.
Preparation Phase
Before you begin cutting, review the PDF legend provided in your download. This will serve as your roadmap. Identify the main structural pieces versus the decorative elements. Understanding the hierarchy of the parts prevents confusion later when you are gluing layers together.
Cutting Your Materials
Load your chosen cardstock into your cutting machine. Ensure your blade depth is set correctly for the thickness of your paper. Thin cardstock may require less pressure, while heavier stocks might need multiple passes. Once cut, carefully remove the excess material (a process known as weeding) to reveal the clean shapes needed for assembly.
Assembly Techniques
Assembly is where the magic happens. The crate relies on interlocking tabs and slots, but adhesive is key for stability. Here are some pro tips for a sturdy build:
- Layering: Start with the base layers. Use foam adhesive squares to add dimension to certain panels. This creates a 3D effect, making the "wooden" slats pop out.
- Inking Edges: To enhance the rustic look, consider using ink on the edges of your brown cardstock. This simulates the wear and tear of real wood.
- Embossing: If you have an embossing folder with a woodgrain texture, run your brown cardstock through it before cutting. This adds incredible realism to the surface.
- Final Touches: Add faux pearls or gold foil accents for a touch of elegance. These small details elevate the crate from a simple box to a luxury gift container.
For those who learn best visually, a step-by-step video tutorial is included with the purchase. Watching the assembly in motion can clarify complex folds and glue points that written instructions might miss.
Supply List: What You Need
To recreate this project accurately, having the right supplies is crucial. Below is a recommended supply list based on the original design specifications. Feel free to adjust colors to match Dad’s favorite team or hobbies.
- Cardstock Base: 6 Sheets of 12×12 Brown Sugar Cardstock and 2 Sheets of 12×12 Oatmeal Cardstock. These provide the primary structure and neutral background.
- Accent Papers:
- 1 Sheet of 8.5×11 Any Color Cardstock (for custom labels or inserts).
- 1 Sheet of 8.5×11 Wave Cardstock (for textural contrast).
- 1 Sheet of 8.5×11 White Cardstock (for clean, bright highlights).
- 1 Sheet of 8.5×11 Red Pattern Paper (Doodlebug – Petite Prints) for a pop of color.
- 1 Sheet of 8.5×11 Gold Foil Paper for luxurious accents.
- Adhesives & Tools:
- Foam Adhesive Squares (to create depth).
- Regular Glue (for flat surfaces).
- Foamcore (3/16” thickness) if you want extra rigidity for the base.
- Decorative Elements: Embossing Folder (Woodgrain), Ink pads, and Faux Pearls.
Common Misunderstandings About Papercrafting
Many people assume that papercrafting requires expensive equipment or advanced artistic skills. This is a misconception. With pre-designed SVG files, the technical drawing work is done for you. Your role is to assemble and decorate. Furthermore, while 12×12 machines are the standard, the scalability of SVGs means you can adapt the design for smaller desks or different workspace constraints. Don’t let the perceived complexity deter you; the joy of creation far outweighs the learning curve.
Making It Personal: Beyond the Box
The true value of the Father’s Day Gift Crate lies in its customization. While the crate itself is beautiful, what you put inside defines the gift. Consider pairing the crate with:
- A Hobby Kit: Small tools for fishing, gardening, or woodworking.
- Gourmet Snacks: Custom cookies, jerky, or coffee beans in mason jars that fit perfectly inside.
- Personalized Notes: Write letters to each other or include photos of family memories tucked between the layers.
By combining the tactile satisfaction of building a crate with the emotional resonance of a personal message, you create a multi-sensory gift experience. It engages Dad’s sight, touch, and even smell (if you use scented papers or include fragrant items).
Conclusion
The Father’s Day Gift Crate SVG is more than just a file; it is an invitation to slow down and create something meaningful. It bridges the gap between modern digital crafting and traditional handmade gifts. By following the provided tutorials, using the suggested supplies, and adding your personal touch, you can produce a stunning presentation box that honors Dad in a unique way. So, gather your materials, fire up your cutting machine, and get ready to surprise him with a gift that is as thoughtful as it is impressive.